In this blog post, I will be directing you on how to create a female BLAZER pattern.
We will not be creating the pattern from scratch. You will need your basic body block pattern as a base to create the female BLAZER pattern. If you are a beginner with pattern drafting, not to worry.
I have you covered.Check out my detailed post on pattern drafting tools and their USES.
Without wasting much time, let’s go straight to our cutting board and start creating our female blazer pattern.
ITEMS NEEDED FOR FEMALE BLAZER PATTERN
These are the things we need to make our female blazer pattern.
Measuring tape
French curve
Owl .This is a kind of pointed object that you will use to make a mark on your pattern. You could also use a normal pin.
You need a rolling cutter. This can be used with normal scissors.
Rolling cutters are, however, sharper and give you a more perfect cut.
Tracing wheel to trace your pattern on another pattern paper
Straight rulers and curved rulers, and of course you need a marker.
The back and front pieces of your basic body block.
If you have not created your basic body block, you can look at this blog post
and create your basic body block. Because you need a basic body block to be able
to create this blazer pattern.
This blog post contains affiliate links, which, when you click and purchase a product, will earn me a commission at no cost to you. Please note that I have worked with these products, and that is why I recommend them to you. I have found them to be quite useful in my sewing projects


TRACING THE FRONT PART OF THE FEMALE BAZER
Place your front basic block on a fresh pattern paper.

Ensure that the pattern paper is about 20 cm longer than the basic body block.
This is because you will need a few centimeters at the bottom and top
This extra centimeter at the top is for drawing the collar. And that at the bottom is to extend the length of the blazer beyond the fullest part of you’re hips.
Place your basic body block at the centre of the pattern paper. Be sure to have about 10 cm above and 10 cm below.
Then just go ahead and trace the whole basic body block using your TRACING wheel.
Please trace only the side dart and leave the center dart.
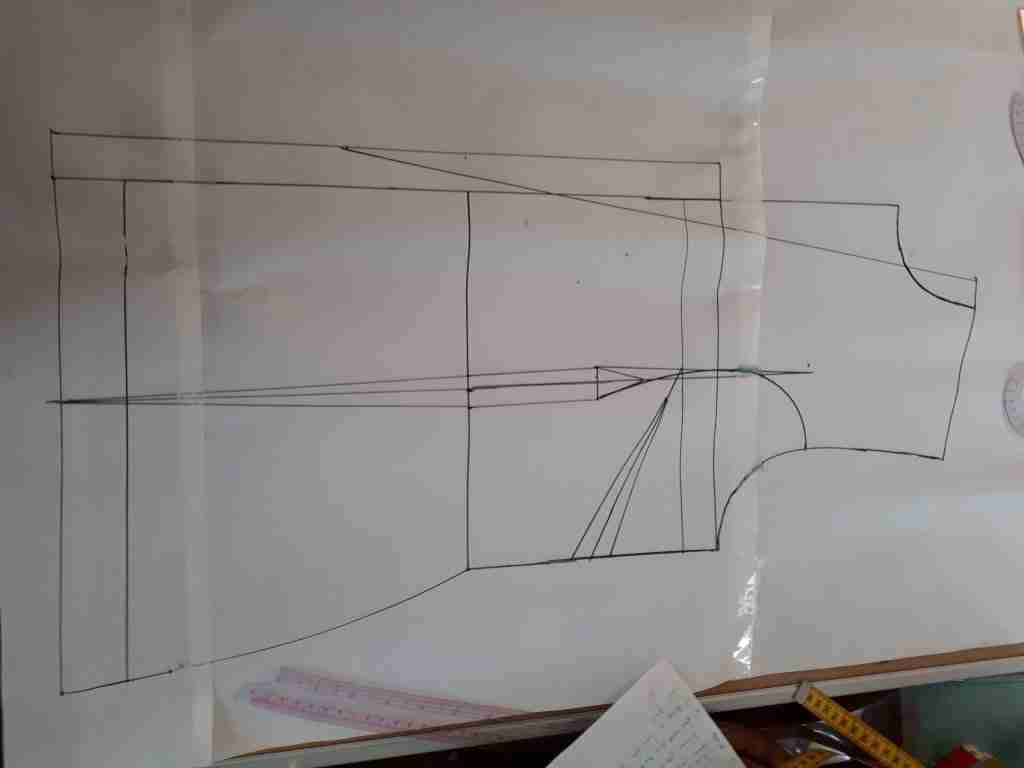
When you are through with the tracing, this is what we are going to work with.
SHAPING PRINCESS CURVE FOR THE FEMALE BLAZER PATTERN.
Next is to create the princess curve for the blazer.
This is why we did not trace the center dart. That is because we are going to
be creating a princess CURVE.
The first thing is to find the center point on your waist line.
My waistline is 26 cm and my center point is 13 cm. I will mark it.
Then, in between this point, I will spread 2.5 cm, which should be around 1.25 cm on both sides of the mark.
That is the width of my dart. Then you come to your bust line and measure 11 cm upwards along the same center waist point.
From this same bust line, come down by 4 cm and 7 cm. You can watch the video below to follow along.
I am going to join all those dots from waist to burst. I will then draw two parallel lines on both dart points up to the 7 cm points.
To form a small rectangle. From the 7 cm point, slant both lines to meet to form the pointed dart end.
DRAWING THE PRINCESS CURVE
To get our princess curve accurately, we need the armpit depth measurements.
Mine is 28 and then Mark 14 cm. That is the midpoint.
Now that all the major points are ready, it’s time to draw our princess curve.
To do this, you need your French curve ruler.
You will also need to watch the YouTube video above to see how I positioned the French curve ruler. This will help you draw a perfect princess curve.
The next thing is to extend the dart to two thirds of the length between your waist and blazer length.
Next, I’ll be extending my blazer. I don’t want it to be exactly at the highest point of my hips. This, however, depends on what you want.
If you want it to be at the highest point of your hips, you can leave it like that.
But I want mine to be a little bit longer. I am going to extend it by 4 cm.

CREATING PART OF THE BLAZER LAPEL
To form the lapel of this blazer, mark 2.5 cm at your chest point and waist point.
Then join the two points, extending the line to the hip point.
Next, come up to the neck section and take 2.5 cm starting from the shoulder line.
And then, from the waist section, go down 8 cm.
Next, draw a straight line, joining the 2.5 cm point to the 8 cm point below the waist line.
By now, your pattern should be looking like the picture below
CREATING THE COLLAR FOR THE BLAZER
We’re going to be creating the collar that sits at the back of the jacket.
This is why we needed 10 cm of extra pattern paper above.
Get the back part of your basic body block. The first thing you need to do is measure the neck curve.
Mine is 9cm.
I will extend the front neck curve upwards.Starting from the 2.5 cm neck extension point by 9 cm.
Then, to get the neck width you know, you normally fold it at the back.
To get that neck width, Measure about 5.5 cm, giving an extra 1 cm
From that 4.5 cm point, draw a line to meet the curve of the neck front.
Then, from the 5.5 cm point, draw a curve to also meet the neck line.
This is just so that your collar can sit comfortably at the back of your neck.
I hope you’re following me, and I hope your pattern is turning out exactly the way my own is.
We’re done with the collar.
LETS CREATE THE FEMALE bloomer ladder.
On the shoulder line, from the neck area, you’re going to come in by 2.5 cm.
from your chest line, you’re going to come in 5 cm.
Draw a curved line from the 2.5 cm point through the 5 cm point up to about 8 cm below the waist line.
I just showed you what the lapel looks like.
Now you need to create the opposite part of the lapel. That is the lapel fold that will fold on top of the one we created.
To be able to do that, please watch the video. It may seem a little complicated at first.But it should not be a problem.
Just watch the video several times and you will get it.
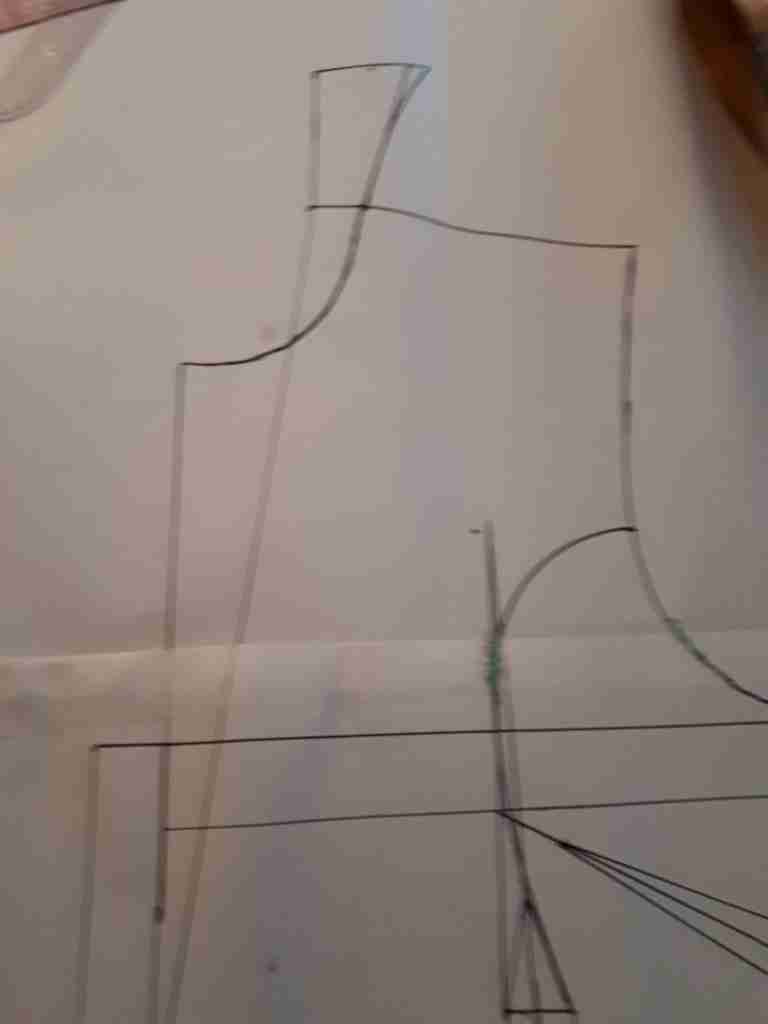
That is what your blazer pattern should be looking like by now.

CREATING THE BACK PART OF OUR BLAZER
Now it is time to create the back part of our blazer
This is not very difficult. It is actually not as complicated as the front part.
You just need the back part of your basic body pattern.
Trace everything, including the darts, on another pattern paper. Leave out the zip panel.You don’t need a zip panel for the back of the blazer. So you’re going to be tracing from the neck point to the bottom in a straight line.
Please don’t trace the curve. We will create another back curve for the blazer.
The first thing is to create a princess dart for the back blazer pattern.
Measure your armhole length and get the center point.
Mine is 26 cm so I will mark 13 cm point
Next, use a curved ruler to join the armhole midpoint to the back dart.
SHAPING THE BACK OF THE PATTERN
You now need to shape the back. You know our back is not straight
Take 1 cm at the waist point inwards.
Measure between the neck drop and the upper bust line at the back.
Get the midpoint and then mark it. My neck drop to my upper burst point is 23 cm.
Midpoint is 11.5 cm. From the 11.5 cm curve, it just gently meets the curved waist point. Then from the waist, curve it to meet the end of the blazer.
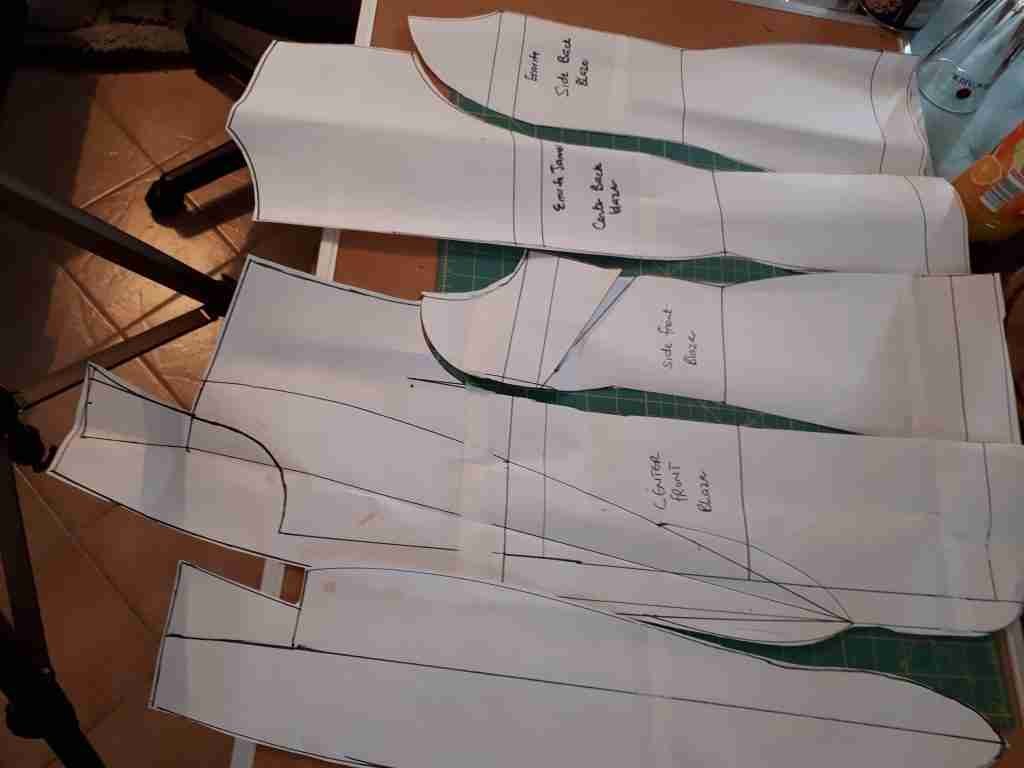
With that, we have completed our female blazer pattern. All we have to do now is cut out the pieces as seen below.
If you want to find out how I sewed the pattern from beginning to end, you can watch the video HERE
CONCLUSION
That is the process of creating a female bazer pattern.I hope you had no challenges creating your own female blazer.If you have any challenges, do not hesitate to drop a comment.
DOWMLOAD YOUR FREE COSTOMIZED PATTERN BLOCKS HERE
Dont forget to follow me on pinterest