
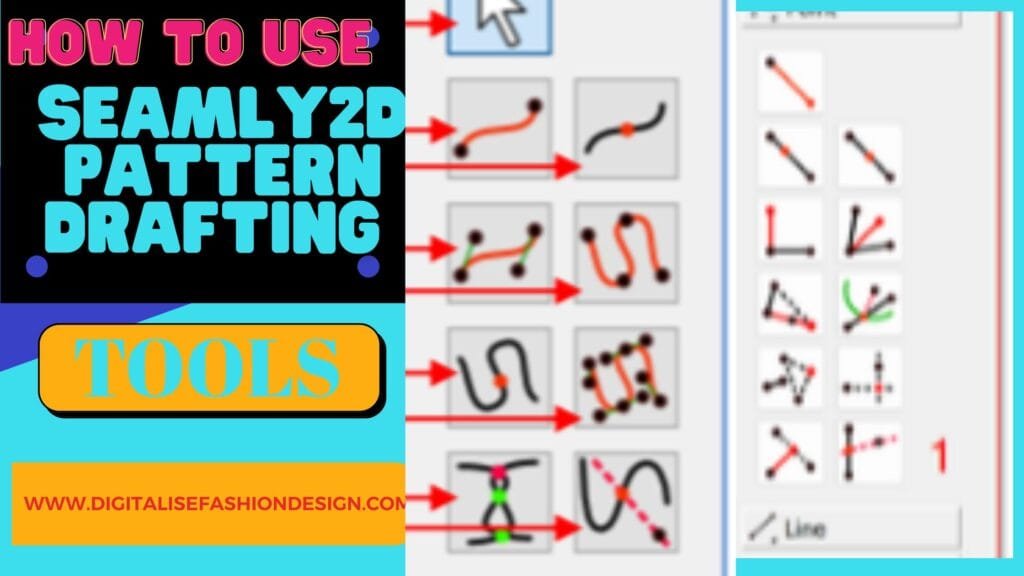
Seamly2D Arc tools can be confusing at times. If you’re anything like me when I first started learning digital pattern drafting, you probably opened Seamly2D, clicked around for a few minutes, and thought…
DOWNLOAD FREE MEASUREMENT SET FOR SEAMLY2D
“Wait… what in the world are all these strange arc icons?”

When I first discovered Seamly2D years ago, I was so determined to learn CAD pattern drafting—but the Seamly2D arc tools scared me the most. In manual drafting, we simply draw curves with a French curve or freehand. But in digital drafting? Everything needs to be precise. Every line. Every curve. Every angle.
One day, while trying to draft a simple shoulder slope, I got stuck because I couldn’t tell where exactly the line should intersect another line using a specific measurement. And that is when the magic of the Arc tools finally clicked for me.
Today, I want to share that “aha moment” with you.
Welcome to Episode 3 of my Seamly2D Beginner Series—where I break down the Arc Tools in the simplest, most beginner-friendly way possible.
Whether you’re a home sewer, a new designer, or someone who just wants to learn digital pattern drafting the EASY way…
You’re in the right place.
⭐ What Are Seamly2D Arc Tools, and Why Do They Matter?
Seamly2D Arc tools help you find exact intersection points, angles, and distances—something that would be extremely hard to “eyeball” manually.
In digital pattern drafting, guessing is no longer an option. Everything needs to be measurable and repeatable.
These tools help you:
- Create curves with specific lengths
- Locate intersection points with mathematical accuracy
- Reproduce patterns perfectly, every single time
- Follow complex pattern instructions without confusion
And yes—once you get the hang of it, they are surprisingly easy.
⭐ Tool 1: Arc With Known Radius (But Unknown Intersection Point)
📌 When to use this
Think of those times when you know you need a 5 cm line from Point A, but you don’t know exactly where it should meet another line.
This tool helps Seamly2D calculate the exact spot for you.
✂ Example Use Cases:
- Creating dart legs
- Finding shoulder slope connection points
- Locating where a dart touches a waistline
- Building sleeve caps with precision
This is one of the most useful arc tools you will use again and again.
OTHER INTERESTING BLOG POST

⭐ Seamly2D arc Tool 2: Point Along Arc
Sometimes you need a point that is a specific distance along a curve.
Or maybe you just want the halfway point of a curve.
This Seamly2D Arc tool does exactly that.
💡 Use it for:
- Splitting necklines
- Dividing armholes into equal parts
- Drafting sleeve heads
- Balancing curved hems
You can even use FX formulas to calculate exact half-points automatically.
CHECK OUT MY AMAZON RECOMMENDED PRODUCTS
⭐ Tool 3: Point with Known Angle on Arc
Pattern books often say things like
“Draw a line at 60° from Point A until it touches the curve.”
In manual drafting, we guess.
But in CAD drafting?
We don’t have to.
This tool lets you place a point at any angle you want.
Great for:
- Shoulder slopes
- Angled style lines
- Geometric or structured patterns
⭐ Tool 4: Intersection of Two Arcs
If you love creating decorative hems or precise distances, this tool will be your friend.
💡 Imagine:
You want a zigzag hem with each point exactly 5 cm from its neighbors.
Instead of guessing, you create two arcs with equal radius and let the Seamly2D arc tool find the exact intersection point.
Perfect for:
- Scallops
- Zigzag hems
- Cape edges
- Geometric designs
⭐Seamly2D arc Tool 5: Circle Intersection (Cleaner Workspace)
This tool works like Tool 4, but without displaying the arcs unless you click them.
If you like a tidy pattern layout, you’ll prefer this tool.
⭐ Tool 6: Point From Arc + Tangent Intersection
Let me be honest—I have never used this tool in real pattern drafting.
But it does help when:
- A tangent needs to touch a circle
- You’re drafting something very geometric or experimental
- You’re following special drafting instructions
Most beginners won’t ever need it, but I show it for completeness.
⭐ Tool 7: Arc With Given Length
This one lets you create an arc with a specific curved length.
It’s not a common drafting need, but it can help when:
- Drafting special sleeve shapes
- Creating decorative curved hems
- Following very specific drafting books
You enter the curve length and angle, and Seamly2D creates it.
⭐ Seamly2D arc Tool 8: Elliptical Arc
This is the rarest arc tool, and most people will never touch it.
But it’s nice to know it exists.
Sometimes it can help with:
- Artistic, non-standard curves
- Special necklines
- Drafting points between perpendicular lines
Again—not essential, but part of the toolbox.
🌟 Final Thoughts—You Did It! (Episode 3 Complete)
When I first started teaching Seamly2D, many beginners told me:
“The arc tools scare me the most.”
But now you know each tool, how it works, and when to use it—all without overwhelm.
You’ve taken one more step toward becoming confident with CAD pattern drafting…
and I’m so proud of you.
Next up is Episode 4, where we’ll explore the Operation Tools—this is where your pattern pieces truly start coming alive.