If you are reading this, it means you want to create your skirt pattern. A pattern to fit your very own shape.
Great idea!
In this blog post, you will learn how to draft your simple skirt pattern as a beginner. This is however, one of the blog series on drafting your body blocks.
It will help you to check out how to create your front and back body blocks.
At the same time, have an idea of how to draft your simple and professional sleeve patterns.
Welcome once again to today’s blog post.
ITEMS NEEDED TO DRAFT YOUR BASIC SKIRT PATTERN
Below are the items you are going to need for the basic skirt pattern.
1. long calibrated ruler
2.Curved ruler
3. french curve ruler
4.some markers of different colours
5.Measuring tape.
6. A paper where you’ve written down all your measurements.
7.Pattern paper
8.scissors.
MEASUREMENTS YOU NEED TO DRAFT YOUR BASIC SKIRT PATTERN
The measurements you need for your skirt pattern is quite few and simple.
It is also easy to take.
I, however, have a full video illustration on how to take a proper body measurement.
If you are interested, you can check that out.
For your skirt pattern, you are going to need the following measurements.
1.Waist circumference
2. waist to hip measurement
3. Hips circumference
4. The length of your skirt
When you’ve done those measurements, you place it near you, as you can see in the YouTube video below.
NOW LETS START DRAFTING OUR SKIRT PATTERN
First, have your pattern paper ready. On the pattern paper, draw a rectangle.
The width of the rectangle is the width of my hips divided by 2 plus about 6 cm.
The 6 cm will serve as the zip panel for the backpart of the skirt pattern.
The length of the rectangle is my skirt length.
Divide the rectangle into two.
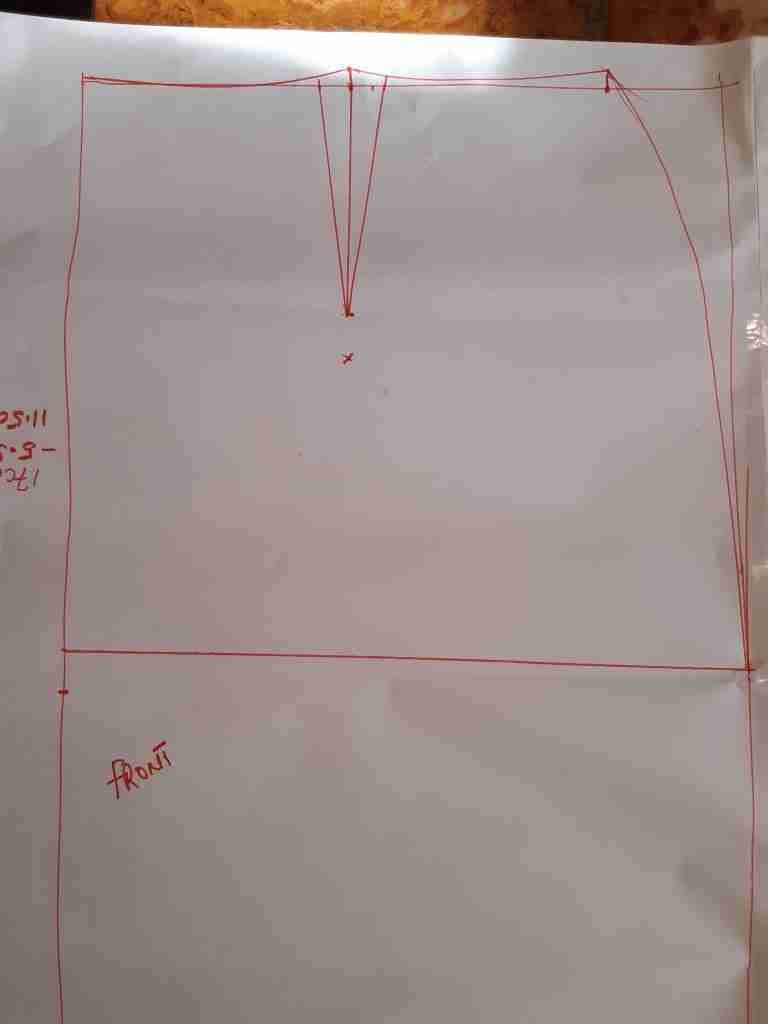
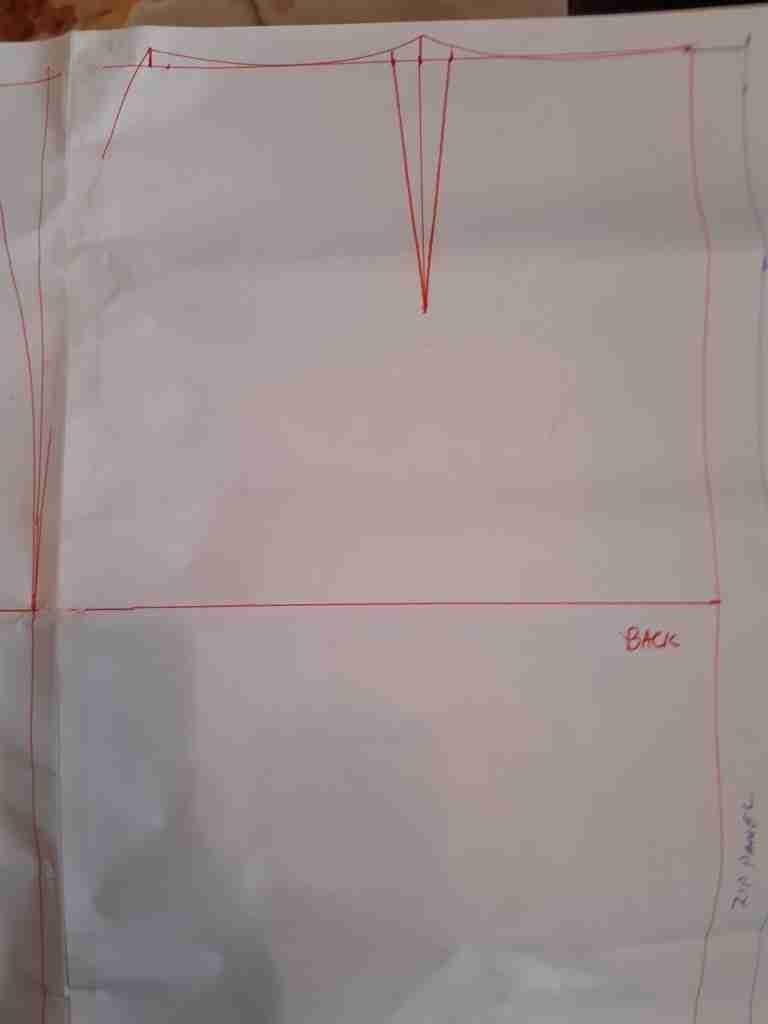
Please do not divide into two equal parts.Using my own measurements, I made the back part 34 cm and the front part 30 cm. This is to make room for the butt at the back.
DRAFTING THE CURVE OF SKIRT PATTERN
First, get your waist to hip measurements. This is normally between 8 and 10 inches.
But since I am measuring mine in centimeters, my own waist to hips gave me 30 centimeters.
I am going to mark it on both sides of the rectangle and draw a line to join the two points.
And now we are going to do some little calculations.


This is to be able to distribute our darts and our curve for the back and the front pattern piece.
First, divide your waist circumference by 2. Then divide your hip circumference by 2.
Subtract the waist value you had from your hip value.
For example, my waist circumference is 94 cm. 94 cm divided by two gave me 47 cm.
my hip circumference is 128 cm divided by 2, which gave me 64 cm.
So I will subtract 47 cm from 64 cm, and that gave me 17. cm.
This 17 cm is what we are going to work with. This is the amount we will remove from the square to form our curve and our darts
DRAFTING OF DARTS AND SKIRT CURVE.
For the back dart, I am going to take in 3 cm. And for the front dart, I am taking in 2.5 cm.
The depth of my dart for the back is 14 cm long. And the depth of my dart for the front is 12 cm long.
Remember we’ve removed 5.5 cm.
That is 3 cm from the back dart and 2.5 cm from the front dart. That brings the total to 5.5 cm.
Subtract 5.5 cm from the 17 cm we had from our previous calculation. That will leave us with 11.5 cm.
This 11.5 cm is what I am going to distribute between the centre line.
That means 5.8 cm on one side and 5.8 cm on the other side.
Remember, you can also watch the video above several times to understand better.
After marking that, I will measure 1 cm upwards from where I have the 5.8 cm points.
Now, to get the hip curve, we are going to use our curve ruler and draw from that 1 cm point to meet with the hip line.
I will do the same for the opposite side.
The front and back curves of the skirt pattern is now ready.
FINAL SHAPING OF THE SKIRT PATTERN
This blog post contains affiliate links, which, when you click and purchase a product, will earn me a commission at no cost to you. Please note that I have worked with these products, and that is why I recommend them to you. I have found them to be quite useful in my sewing projects
What you need to do next is make up for the one cm that was added to the curved end.
To do that, add 0.5 cm on each leg of the front and back darts. Then use your curve ruler to join these dots to the edge of your skirt
Please watch the video to see exactly how you can do that.So that your skirt pattern can come out perfect.
CONCLUSION
That is the simplest way you can draft your basic skirt block pattern.
If there’s anything you do not understand Do not hesitate to drop your comments
I know the calculations may seem confusing initially the first time.
But if you watch the video several times, you’ll be able to understand it very well.
What you should particularly remember is:
That your darts for the front are shorter than your darts for the back. So it depends on you but it should not
be more than 5 inches for the front and 4 inches for the back.
If your curve is too much you could decide to add a little bit more to your darts width or even better create two darts.
This is so that you’ will have a skirt curve that will not fold at the hips after you sew.
A FREE PATTERN DRAFTING BOOK DOWNLOAD FOR YOU FOR READING TO THE END
If you have any challenges, do not hesitate to drop your concerns below. Remember to follow me on pinterest