Introduction: From Paper Chaos to Seamly2D Precision
Learning how to use Seamly2D pattern drafting tools is a must. Especially if you want to learn digital pattern drafting.
Let’s be honest—paper patterns are a mess.
They tear, they wrinkle, and they never seem to fit back into the envelope once you’re done.
That’s why so many home sewers and fashion entrepreneurs are ditching the analog chaos and turning to Seamly2D, a completely free, open-source CAD pattern design software that makes pattern drafting faster, cleaner, and far more accurate.
If you’ve been following my Seamly2D tutorial series, you already know how to download the software and create your measurement sets.
Now it’s time for the real fun—learning how to use Seamly2D’s pattern drafting tools to build your first digital block.
Whether you’re sketching your next bestseller or refining your bodice sloper, these tools are where digital fashion magic starts.
DOWNLOAD YOUR MULTISIZE TABLE FOR SEAMLY2D HERE FREE
Why Start with Seamly2D?
Because it’s free, flexible, and surprisingly powerful.
Seamly2D doesn’t lock you into a subscription or watermark your work like some other CAD platforms do. It’s open-source—meaning you can experiment as much as you want without paying a cent.
It’s also beginner-friendly. The interface looks intimidating at first, but once you learn the tool icons, you’ll see how Seamly2D pattern drafting tools mimic the logic of manual drafting—only smarter.
You get full control over your measurements, lines, curves, and symmetry, plus the bonus of digital precision—no more “oops, I drew that line 2 mm off.”
YOU CAN WATCH THE YOUTUBE VIDEO HERE
Getting Started: Setting Up Your First Pattern Block
When you open Seamly2D, you’ll notice all the Seamly2Dpattern drafting tools are greyed out. That’s because the software needs a measurement set before it activates.
👉 If you haven’t created one yet, pause here and check out the video tutorial on “How to Create Measurement Sets in Seamly2D.”
Once your measurements are loaded, go to File → New, name your file (for example, Draft Block 1), and click OK.
Boom. You’re ready to start drafting.
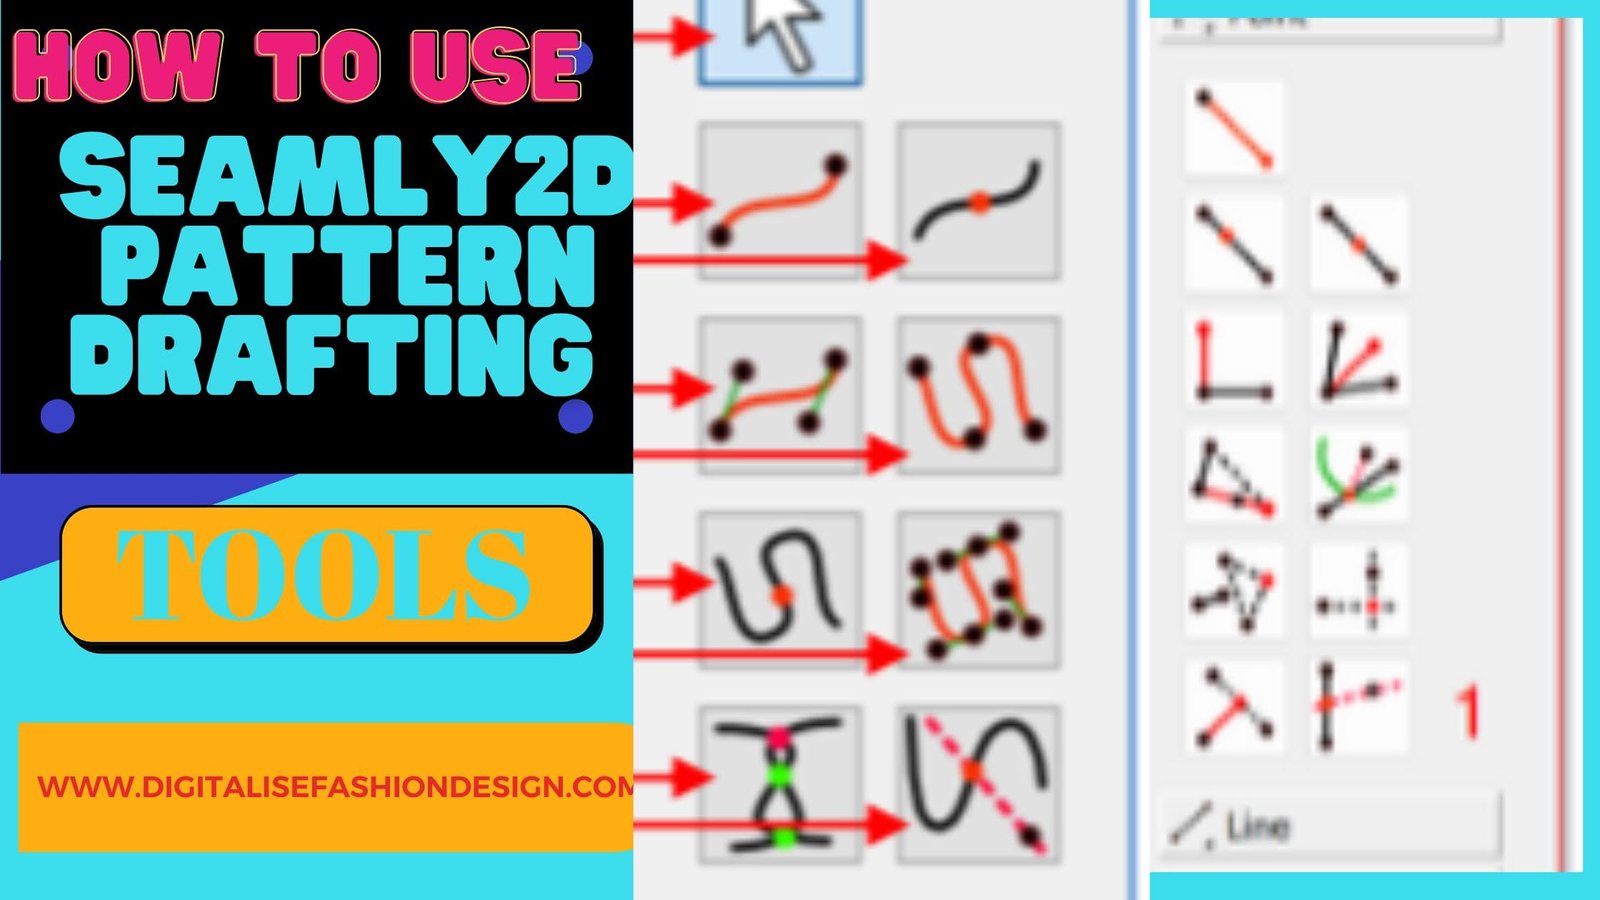
Understanding Seamly2D Pattern Drafting Tools
The Seamly2D pattern drafting tools are grouped under categories—points, lines, curves, and arcs. In this guide, we’ll start with Points, since they’re the backbone of every pattern you’ll create.
Think of points as anchors. Every line, curve, and shape you draw will connect to or build from a point.
1. Point at Distance and Angle Tool
This is your go-to for drawing straight lines in any direction.
- Click the Point at Distance and Angle icon.
- Choose your starting point (usually the dot that appears when you first open a new file).
- Enter the length (for example, 19 cm) and angle.
Pro tip:
- Right = 0°
- Up = 90°
- Left = 180°
- Down = 270°
Once you hit OK, you’ve created your first digital line. To zoom out or fit your view, click “Fit” at the top right of your screen.
2. Point Along Line Tool Seamly2D pattern drafting tools
Want to mark measurements along a line—like your bust, waist, or hip divisions? This tool does that.
- Click Point Along Line
- Select your starting point
- Enter the measurement (say, 8 cm)
It creates a new point exactly that distance away—ideal for marking quarter measurements or dart positions.
3. Midpoint Tool
Need to divide a line into two equal halves?
This tool finds the midpoint automatically.
Click the Midpoint Tool, then select your line. Seamly2D does the math for you and drops a new point right in the middle. Perfect for symmetrical designs.
4. Perpendicular Line Tool
This one is crucial for building bodices or any right-angle construction.
Click the Perpendicular Tool, select the baseline, then type in the desired length (e.g., 10 cm). Seamly2D draws the perpendicular line instantly.
Think of it as your digital set square—no fumbling with rulers required.
5. Line Intersection Tool Seamly2D pattern drafting tools
When two lines cross, this tool helps you find the exact intersection point.
You’ll use this when shaping curves (like armholes or necklines) or aligning darts. It’s all about getting those crisp, geometrically correct points that make your pattern look professional.
6. Shoulder Slope Tool
Shoulder slopes can be tricky when you’re working manually. In Seamly2D, there’s a dedicated tool that helps you draw a line passing through a known point to another line at an unknown angle.
It’s perfect for creating that classic shoulder drop (usually 1.5 cm down from the neckline). Once you grasp it, you’ll never eyeball a slope again.
7. Perpendicular Through Point Tool
This one helps you create a perpendicular line through an existing point—especially handy when drawing vertical lines that must meet a slanted line at a right angle.
It’s a lifesaver for complex pattern intersections like armhole corners or sleeve heads.
OTHER RELEVANT BLOG POST


8. Perpendicular from Line Tool
Let’s say you’ve drawn a line that’s not horizontal or vertical—and you want a perpendicular from it. This tool gives you that precision.
Click the line, choose your start point, and Seamly2D calculates the perfect perpendicular. No geometry degree needed.
9. Line at Angle to Another Line
Angles are the backbone of fitted designs. This tool lets you draw a line from a baseline at a specific angle—say, 125°—so you can shape darts or slants accurately.
You can even tweak the angle later by right-clicking → Properties → Adjust the angle value.
Tips for Seamly2D pattern drafting tools for Beginners
- Zoom in and out often. Use the Fit button to see your full workspace.
- Label everything. Each point gets an automatic name (A1, A2, etc.), but rename them if it helps you stay organized.
- Save frequently. Seamly2D doesn’t auto-save—treat your project files like newborns.
- Experiment fearlessly. Since it’s open-source, you can’t “break” anything. Worst case, delete a point and start over.
CHECKOUT MY AMAZON RECOMMENDED PRODUCTS
Why Learning Seamly2D Pattern Drafting Tools Is Worth Your Time
Once you get the hang of it, Seamly2D becomes addictive. You’ll love how clean your patterns look, how quickly you can adjust sizes, and how seamlessly your digital drafts translate to fabric.
Plus, digital pattern drafting means:
- No paper clutter
- No scaling errors
- No redrawing every time someone asks for a different size
It’s the smartest move you can make for your fashion workflow—whether you’re designing for clients or creating your own indie brand.
Final Thoughts
You just learned how to use Seamly2D pattern drafting tools—the foundation of every clean, digital pattern you’ll ever make.
Keep practicing with these point and line tools before moving on to curves, arcs, and advanced shapes. The more comfortable you get with seamly 2D pattern drafting tools, the faster your creativity flows.
Want to go deeper? Watch the full video tutorial or check back for Part 2, where we’ll cover Seamly2D’s curve tools and more advanced drafting techniques.
Until then, keep experimenting—your future self will thank you when your designs look sharp enough to sell.
SUBSCRIBE TO MY YOUTUBE CHANNEL FOR CAD PATTERN DRAFTING TIPS