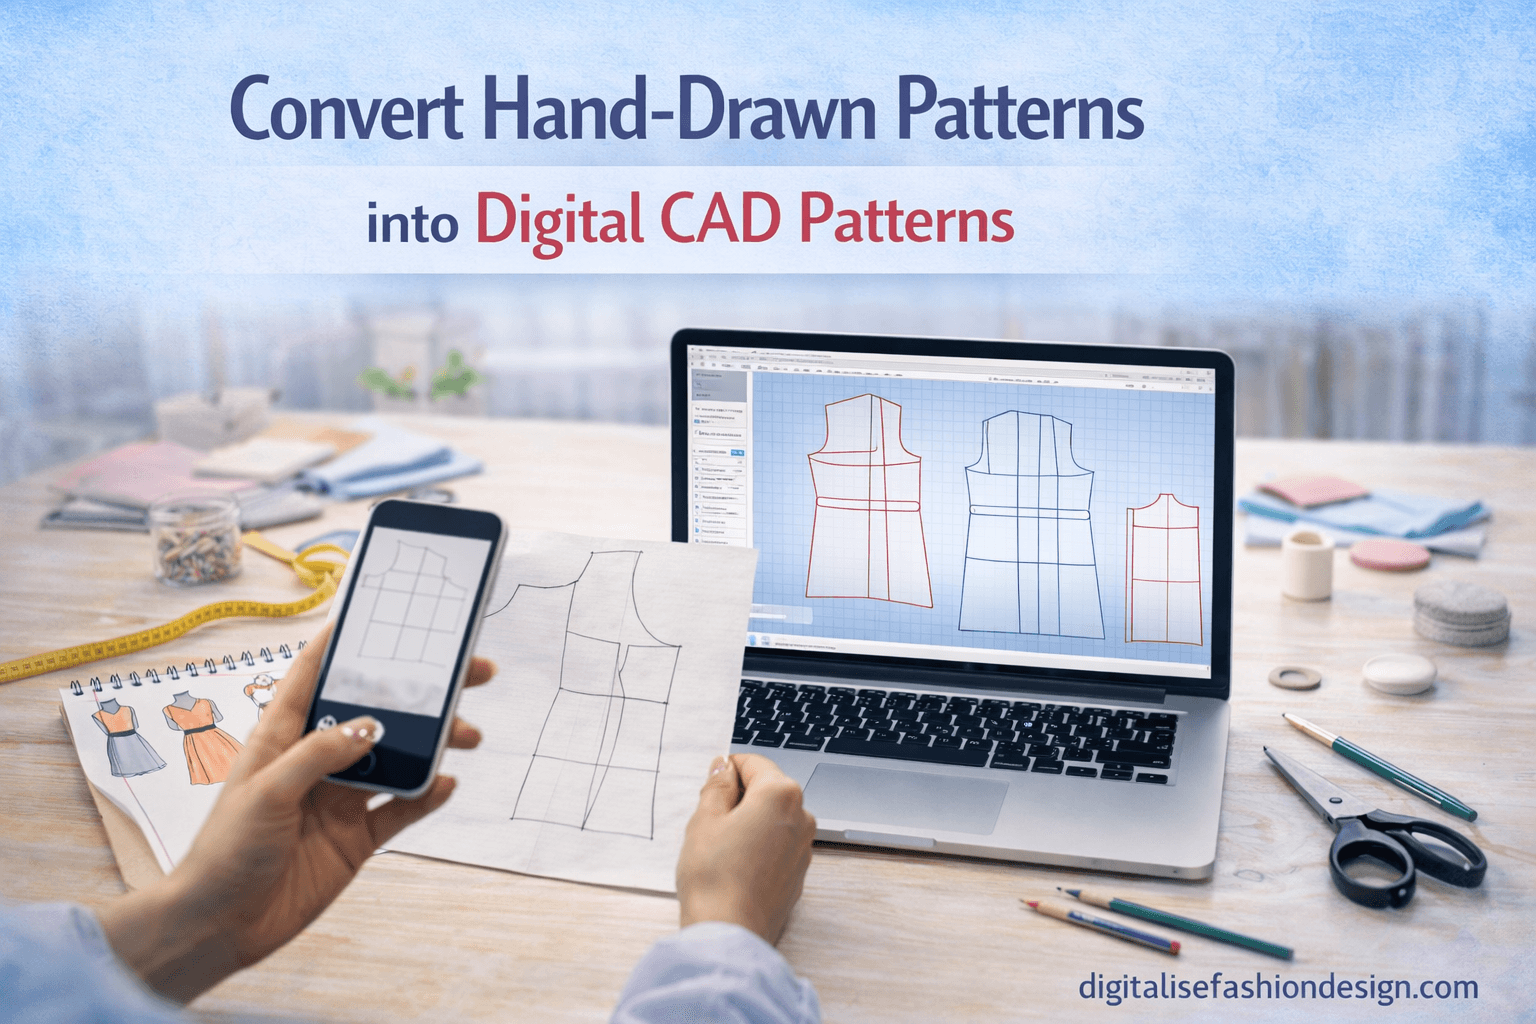
If you want to know how to convert hand-drawn patterns to CAD, you are in the right place.
Have you ever created a beautiful pattern on paper and thought…
“What if I could reuse this without redrawing it again and again?”
If you’ve ever worked with traditional pattern drafting, you already know how valuable your paper patterns are. But you also know the limitations.
CLICK TO DOWNLOAD YOUR CUSTOM FREE BODY BLOCKS FOR PRACTICE

Patterns tear.
They get lost.
They are difficult to adjust.
And every time you want to make changes, you often have to start all over again.
This is exactly why many modern designers are learning how to convert hand-drawn patterns to CAD.
Whatever made you click on this topic, I’m glad you did.
Because once you understand how to digitize sewing patterns, you unlock a completely new level of efficiency in your design process.
With the right digital pattern making tools and a simple CAD fashion workflow, you can turn your hand-drawn patterns into reusable, editable digital assets.
Let’s walk through how this works step by step.
What Does It Mean to Convert Hand-drawn Patterns to CAD?
To convert hand-drawn patterns to CAD simply means taking a physical paper pattern and transforming it into a digital format using garment pattern software.
Instead of working with paper, you recreate your pattern inside digital pattern making tools where it can be edited, resized, and stored permanently.
Once digitized, your pattern becomes part of your CAD fashion workflow, allowing you to:
- adjust measurements instantly
- reuse patterns multiple times
- create size variations easily
- store patterns digitally without physical clutter
Why You Should convert hand-drawn patterns to CAD Patterns
Before learning how to digitize sewing patterns, it’s important to understand why this process is so powerful.
When patterns remain on paper, they are limited.
But once you convert hand-drawn patterns to CAD, everything changes.
You can modify your pattern without redrawing it.
You can scale it for different body sizes.
You can create new designs based on existing blocks.
And perhaps most importantly, you build a digital library of patterns that grows with your skill.
This is why many designers are now adopting a CAD fashion workflow.
THIS YOUTUBE VIDEO WILL SHOW YOU HOW TO DIGITIZE YOUR PAPER PATTERNS
Tools You Need to convert your Hand-Drawn Patterns to CAD
To successfully convert patterns to CAD, you don’t need expensive equipment.
You simply need the right setup.
1. Scanner or Camera
You need a clear image of your paper pattern. A scanner works best, but a high-quality phone camera can also work.
2. Pattern Drafting Software
You will need digital pattern-making tools such as the following:
- Seamly2D
- Valentina
- Pattern Maker Pro. this is actually the best and most easy software to use for this process
3. Measurement Reference
You should have the original measurements used to draft the pattern.
This helps maintain accuracy when digitizing.
OTHER RELEVANT BLOG POSTS THAT MIGHT INTEREST YOU


Step-by-Step: How to Convert hand-drawn Patterns to CAD
WANT TO CONVERT YOUR CAD SKILLS TO CASH? CHECK OUT THIS COURSE
Now let’s go through the exact process of converting your pattern.
Step 1: Scan or Photograph Your Pattern
Start by creating a digital image of your pattern.
Make sure:
- the image is clear
- the pattern is flat
- all lines are visible
This image will act as your reference inside your digital pattern-making tools.
Step 2: Import the Pattern into CAD Software
Open your garment pattern software and import the scanned image.
Most digital pattern-making tools allow you to place an image in the background.
This gives you a visual guide to trace over.
Step 3: Scale the Pattern Correctly
Before tracing, you must ensure the pattern is scaled properly.
Use a known measurement (like bust width or pattern length) to adjust the image size.
This step is critical in maintaining accuracy when you convert patterns to CAD.
Step 4: Trace the Pattern Digitally
Using your software tools, begin tracing the pattern:
- outline pattern pieces
- mark key points (bust, waist, hip)
- draw curves (armholes, necklines)
This is where your CAD fashion workflow begins to take shape.
Step 5: Add Measurements and Variables
Instead of keeping the pattern static, you can now enhance it.
Add measurement formulas like the following:
- bust ÷ 4
- waist ÷ 4
- ease allowances
This transforms your pattern into a dynamic digital design.
Step 6: Add Seam Allowances
Many digital pattern making tools allow you to add seam allowances automatically.
This ensures consistency across all pattern pieces.
Step 7: Save and Organize Your Pattern
Once complete, save your pattern file.
Now you have:
- a reusable digital pattern
- a scalable design
- a permanent asset in your design library
This is the true power of learning how to digitize sewing patterns.
Common Mistakes to Avoid
When learning to convert patterns to CAD, beginners often make a few mistakes.
- Incorrect scaling
- Skipping measurement validation
- Poor image quality
- Forgetting to add seam allowances
Taking your time with each step ensures accuracy.
Advantages of a CAD Fashion Workflow
Once you start working digitally, you’ll quickly notice the benefits.
Patterns become easier to adjust.
Design changes take minutes instead of hours.
Your work becomes more organized.
A strong CAD fashion workflow allows you to design faster and smarter.
The Bigger Picture
Think about this for a moment.
Every pattern you digitize becomes part of your long-term design system.
Instead of starting from scratch each time, you build on your previous work.
That’s how professional designers work.
They don’t just create patterns.
They build systems.
And learning how to convert hand-drawn patterns to CAD is one of the most important steps in that process.
FAQ
What is the best way to convert patterns to CAD?
The best way is to scan your pattern, import it into CAD software, and trace it using digital pattern-making tools.
Can I digitize sewing patterns without a scanner?
Yes, you can use a high-quality phone camera, but ensure the image is flat and properly aligned.
What software is used to digitize sewing patterns?
Common tools include Seamly2D, Valentina, Optitex, and other garment pattern software.
Why should I convert patterns to CAD?
Digital patterns are easier to edit, scale, store, and reuse, making your workflow more efficient.
SUBSCRIBE TO MY YOUTUBE CHANNEL FOR FREE CAD PATTERN DRAFTING COURSES ONLINE